Have you ever looked at a piece of jewelry and wished you could wear something that truly feels like you – not just something you picked off the shelf, but something you designed with your own ideas? It’s because of this feeling that custom pendants are becoming so popular today.
A custom pendant allows you to have something personal. It could be a symbol that means something special to you, a name, a date, or just a shape you like. The best part? You don’t have to be a professional jeweler to get started. With modern tools like CAD (computer-aided design), it’s easier than ever to turn your idea into a real piece of jewelry.
In this guide, we take you through every step of the process of creating a custom pendant using CAD – from your first idea to holding the finished piece in your hands.
What Is CAD And Why Do Jewelers Use It?
CAD stands for Computer-Aided Design. In the world of jewelry, that means using specialized software to create a three-dimensional model of a piece before any tools are lifted or any metal is melted.
Think of it like a blueprint. When an architect designs a building, they first create detailed plans so the builders know exactly what to build. CAD does the same for jewelry. The digital model shows every angle, every curve, every tiny detail-and it can be measured down to a fraction of a millimeter.
Before CAD became commonplace, jewelers carved wax models by hand. That process was slow and left very little room for change. With CAD, a designer can create a highly detailed model, show it on a screen, and adjust it based on your feedback-all before any physical work begins. This saves time, money, and the frustration of not getting what you envisioned.
Step 1: Start With a Clear Design Idea
Every great custom pendant starts with a vision. Before you open any software or call any designer, you need to think about what you really want.
Here are a few questions to ask yourself:
- What does this pendant represent? A person, a memory, a place, a belief?
- What shape or style feels right? Geometric? Organic? Text-based?
- Will it have gemstones, or will it be a plain metal piece?
- How will you wear it – every day or on special occasions?
It helps to gather references. Save photos from Pinterest or Instagram, sketch a quick doodle on paper, or even describe the feeling you want the pendant to give you. It Cost to Design a Jewelry CAD File You don’t need to know specific jewelry terms at this point – you just need to have a clear enough picture in your mind that you can share it with someone else.
Also think about your lifestyle. If you plan on wearing your pendant every day, you’ll want something durable and practical. A delicate, delicate design with lots of small parts won’t hold up well to everyday wear.
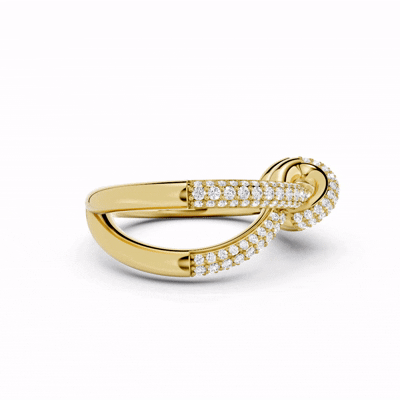
Step 2: Choose Your Metal and Gemstones
Once you’ve got your design concept in place, it’s time to think about the material. The metal you choose will affect both the look and price of your pendant.
Common metal options include:
- Yellow gold – classic, warm, and timeless
- White gold – modern and sleek
- Rose gold – soft, romantic, and trendy
- Platinum – extremely durable and naturally white
- Sterling silver – affordable and easy to work with
If you want to add gemstones, this is also the time to make this decision. Think about the color, type, and how the stone will be held in place. A bezel setting wraps the metal around the stone for protection, while a prong setting lets more light through. Each has a different look and practical benefits.
In addition to the stones and metal, consider the finishing touches. Do you want a shiny polish or a matte surface? Do you want engraving or enamel work? Special finishes like oxidation or plating can add depth and character to your pendant.
Step 3: Create the Initial Sketch
Before moving on to digital design, most jewelers and designers create rough sketches. These drawings don’t have to be perfect or artistic-they’re just a way to put your vision down on paper so the designer can understand which direction to go.
At this point, think about the overall design. Where will the bell (the loop that connects to your chain) sit? How big is the main shape? Are there multiple layers or just a flat surface? These basic structural questions help guide the next digital build.
Share your sketches with any reference photos. Even a doodle on a napkin can be a starting point for a stunning piece of jewelry. The designer uses this to begin translating your idea into a digital model.
Read More: What is Gold Vermeil: Meaning, Process & Benefits
Step 4: Build the 3D CAD Model
This is where the real magic happens. Using jewelry CAD software, the designer creates your pendant as a three-dimensional digital model. Popular programs used for this include Rhino, Matrix, and Blender. Each tool has its own strengths, but they all produce the same result – an accurate, detailed model that shows what your pendant will look like.
The CAD process usually follows this order:
- Block out the main shape – the pendant base, without any fine detail.
- Add stone settings, engravings, or design elements using symmetry tools to keep everything balanced.
- Check proportions by rotating the model and zooming into fine details.
- Apply rendering – adding lighting, metal texture, and gemstone sparkle to create a photo-realistic preview.
One key thing the designer keeps in mind during this process is structural safety. The metal walls should not be thinner than about 0.8mm – otherwise the piece could crack during casting or break when worn. The bell should be strong enough to support the weight of the pendant. And any lugs holding the stones should be thick enough to hold securely.
Another key advantage of working digitally is the ability to accurately predict the weight of the metal. The CAD model tells the jeweler almost exactly how much gold or silver will be needed, meaning you get an accurate cost estimate before any physical work begins.
Step 5: Review, Give Feedback, and Approve
Once the initial CAD model is ready, the designer shares it with you. This is your chance to look at the design from every angle and decide if anything needs to be changed.
Don’t rush this step. Look carefully at the proportions – does the pendant feel too big or too small for how you plan to wear it? Are the gemstones positioned correctly? Does the overall shape match what you had in mind?
It’s perfectly normal for a design to go through multiple rounds of iteration. Some projects only require one or two changes. Others require several rounds before the design feels right. The important thing is to speak up if something doesn’t look the way you want it to. Once the piece moves on to the next stage, changes become more difficult and expensive.
Teams at studios like Metalonyx carefully guide clients through this review step, ensuring that every detail is confirmed before production begins. CAD approval is your final sign-off – think of it as a contract with yourself.
Step 6: Print the Wax Model
After you approve the CAD design, the digital file is sent to a 3D printer. The printer reads the file and creates a physical model – usually made of resin or wax – that exactly matches your design. The entire process usually takes less than 48 hours.
Some jewelers allow you to try on or test a wax prototype before casting. This lets you see what the piece looks like in real life, how it sits on your skin, and whether the size feels right. It’s a smart step that can save you from any last-minute surprises.
Step 7: Cast the Metal
Now comes the process that turns your wax model into actual metal. This method is called lost-wax casting, and it has been used by jewelers for thousands of years – although today it works hand in hand with modern technology.
Here is how it works:
- The wax model is placed inside a flask and surrounded with a plaster-like material called investment.
- The flask goes into a kiln. Heat burns away the wax completely, leaving behind a perfect hollow mold.
- Molten metal – gold, silver, or platinum – is poured into that hollow mold.
- Once the metal cools, the investment is broken away to reveal a raw metal version of your pendant.
At this point, the pendant is still rough. It has what jewelers call a casting skin – a slightly uneven surface that needs to be polished. The jeweler files the surface, preparing it for the next steps.
Step 8: Set the Stones and Apply Finishing Touches
If your pendant contains gemstones, this is when they are placed. Stone setting is a highly skilled task that requires a steady hand and a keen eye. Each stone is carefully secured in its setting – prong, bezel or channel – and tested to make sure it doesn’t move or rattle.
After the stones are set, the jeweler works on the surface finish. This is when the pendant is polished to a bright shine, or textured if you’re asking for a matte or hammered look. Special effects like oxidation (which darkens the metal and gives it a vintage feel) or plating (which adds a thin layer of gold or other metal) are also applied at this stage.
If your pendant requires enameling – which adds colorful, glass-like parts – this step comes before final polishing because the surface must be clean and ready for the enamel to bond properly.
You may also like: Different Types of Jewelry Clasps: Uses, Benefits, & Tips (Guide 2026)
Why Choose The CAD Process For Your Custom Pendant?
Using CAD to design a custom pendant comes with several real advantages that traditional hand-carving simply cannot match:
- You see the design before it gets made – no guessing or surprises.
- Changes are easy and cheap during the digital stage.
- The design is incredibly precise – every curve and measurement is exact.
- Intricate details that would be impossible to carve by hand are easy to create digitally.
- Metal weight predictions mean more accurate pricing upfront.
CAD used for jewelry design and production For anyone creating a pendant for the first time, the CAD process removes a lot of the uncertainty and gives you confidence that what you imagined is actually what you will receive.
Pro Tips To Get The Best Results
- Be as detailed as possible when sharing your idea. The clearer your brief, the fewer revisions you will need.
- Share multiple reference images, not just one. Each image shows a different aspect of what you like.
- Ask questions during the CAD review stage. Do not approve something if you are unsure about any detail.
- Trust the process. Even if the wax model looks rough, the final polished piece looks completely different and far more beautiful.
- Ask for a physical prototype print if you want to try the size before casting in metal.
Metalonyx Jewelry Design Company offer end-to-end support through the CAD process, which can be especially helpful for first-time customers who aren’t sure what to expect at each stage.
Conclusion
Creating a custom pendant with CAD is one of the most rewarding things you can do as a jewelry lover. You’re not just buying something off the rack – you’re creating something that doesn’t exist anywhere else in the world.
The process takes your raw idea through design, digital modeling, wax printing, casting, and finishing – each step bringing your vision closer to reality. And with CAD at the center, you always know exactly what you’re getting before any metal is poured.
So whether you want a minimalist starter pendant or an elaborate statement piece with multiple stones, the CAD process gives you the tools and confidence to make it happen. Start with your idea – the rest follows.
Frequently Asked Questions (FAQs)
The entire process from design to finished piece typically takes one to four weeks, depending on how complex the design is and how many rounds of revisions are required.
No. Most clients work with a professional CAD designer who creates a model based on their ideas. All you need to do is share your concept clearly – through sketches, photos or descriptions.
Yes. The whole point of the CAD review phase is to catch changes before production begins. You can request adjustments to the shape, size, stone placement or any other element. Just make sure you finalize everything before giving your approval.
Not necessarily. CAD actually reduces costs in the long run because revisions are made digitally before any metal is used. Traditional hand-carved carving is difficult to change after it’s cut, which can lead to material waste and labor costs.
Gold (yellow, white, or rose), platinum, and sterling silver are the most common choices. The best option depends on your budget, your style preferences, and how often you plan to wear the piece. Your designer can help you choose the right metal for your specific design.
CAD is significantly more accurate. Digital models can be measured to within a fraction of a millimeter, which means that the stone settings fit perfectly, the walls are the right thickness, and the overall structure is built to last. Hand carving is a great skill, but it can’t match the precision of digital design.
How useful was this post?
Click on a star to rate it!
Average rating 4.6 / 5. Vote count: 27
No votes so far! Be the first to rate this post.
We are sorry that this post was not useful for you!
Let us improve this post!
Tell us how we can improve this post?